序言
继上一篇 一套管理系统基础模版
详细梳理一下安装流程,功能说明,开发规范等。
- 后端项目结构?
- 如何从零搭建环境开发?
- 如何打包部署?
- 接入开发及规范
- 项目地址
- 小结
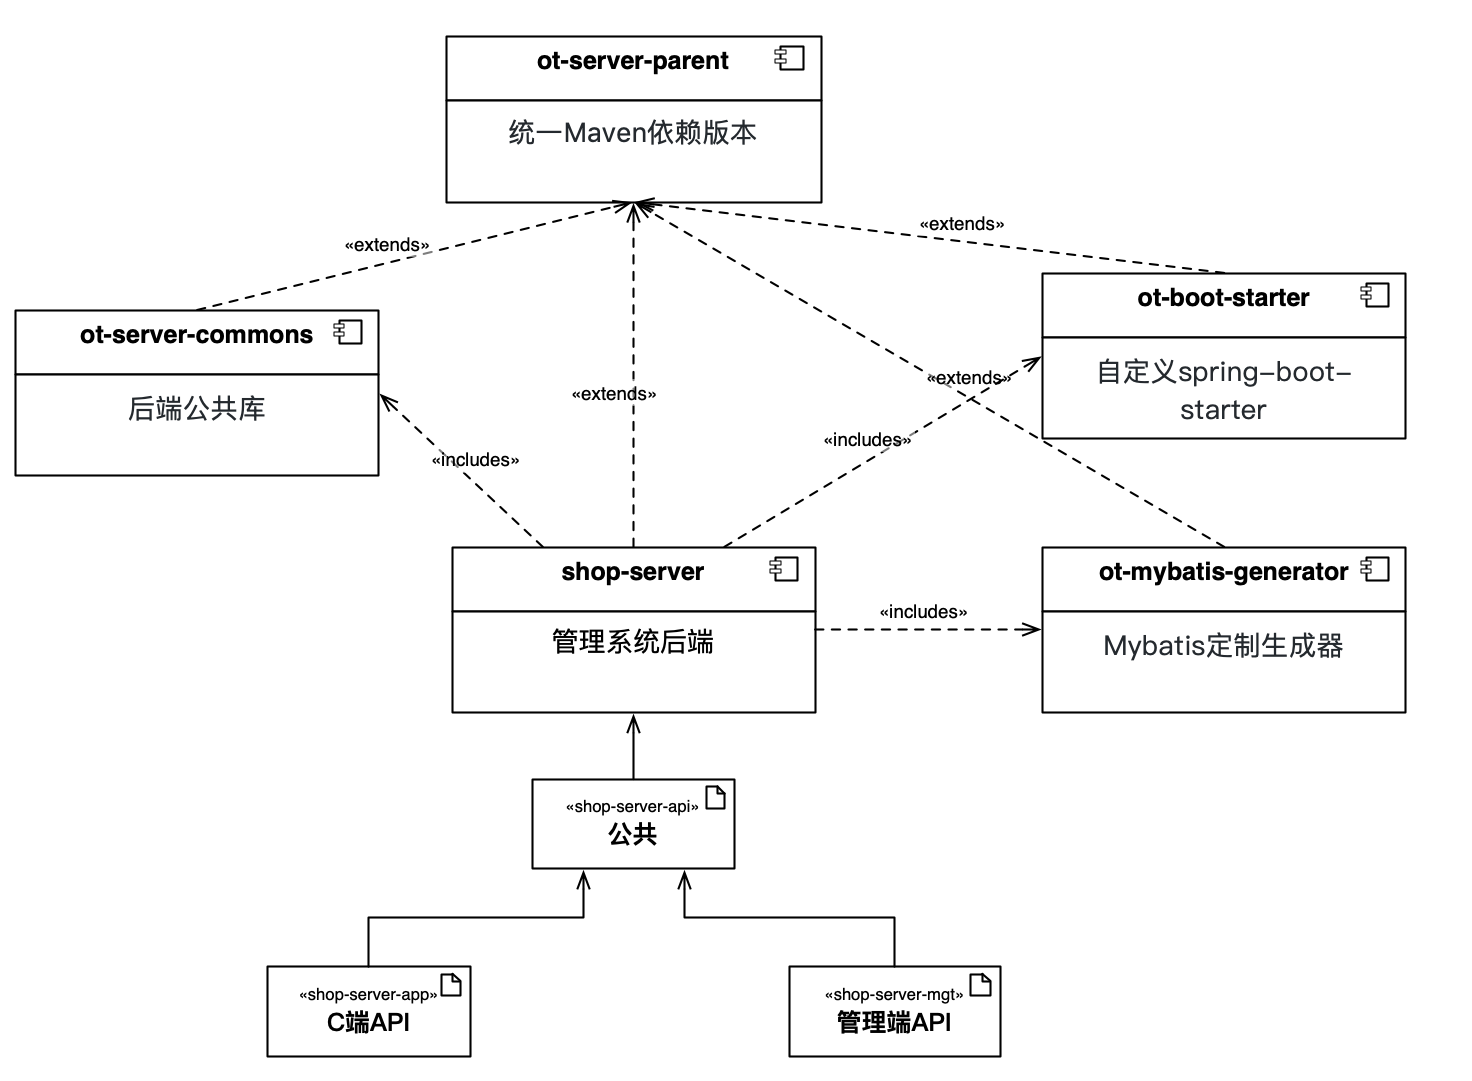
后端项目结构
shop-server 依赖以下项目
https://github.com/cuteJ/ot-server-parent (统一版本插件管理)
https://github.com/cuteJ/ot-server-commons (公共基础类)
https://github.com/cuteJ/ot-boot-starter (自定义Spring boot starter)
所依赖的项目安装包位置:https://maven.pkg.github.com/cuteJ/ot-server-parent
依赖继承关系如下:
如何从零搭建环境开发
这一节为零基础搭建,经验开发人员可直接跳过!!!!
安装环境
-
下载对应平台JDK1.8 Download
1234567891011# 执行以下命令,显示版本信息,安装完毕。➜ ~ java -versionjava version "1.8.0_151"Java(TM) SE Runtime Environment (build 1.8.0_151-b12)Java HotSpot(TM) 64-Bit Server VM (build 25.151-b12, mixed mode)#如果提示找不到对应命令添加➜ ~ vim .bash_profileexport JAVA_HOME=/Library/Java/JavaVirtualMachines/jdk版本/Contents/Homeexport PATH=$PATH:$M2_HOME/bin -
下载Maven Download
1234567891011121314# 多个PATH变量用冒号分割➜ ~ vim .bash_profileexport M2_HOME=/Users/lixingping/soft/apache-maven-3.5.2export PATH=$PATH:$M2_HOME/bin# 执行以下命令,显示版本信息,安装完毕。➜ ~ mvn -vApache Maven 3.5.2 (138edd61fd100ec658bfa2d307c43b76940a5d7d; 2017-10-18T15:58:13+08:00)Maven home: /data/apache-maven-3.5.2Java version: 1.8.0_151, vendor: Oracle CorporationJava home: /Library/Java/JavaVirtualMachines/jdk1.8.0_151.jdk/Contents/Home/jreDefault locale: zh_CN, platform encoding: UTF-8OS name: "mac os x", version: "10.14.6", arch: "x86_64", family: "mac"配置Maven settings.xml
settings.xml 有两个目录
1. ~/.m2 用户级配置(如果该目录下面无文件则新建) 2. $M2_HOME/conf 全局配置
在settings.xml 文件添加以下内容:
12345678910111213141516171819202122232425262728293031323334353637383940414243<?xml version="1.0" encoding="UTF-8"?><settings xmlns="http://maven.apache.org/SETTINGS/1.0.0"xmlns:xsi="http://www.w3.org/2001/XMLSchema-instance"xsi:schemaLocation="http://maven.apache.org/SETTINGS/1.0.0 http://maven.apache.org/xsd/settings-1.0.0.xsd"><servers><server><id>github</id><username>cuteJ</username><password>b5bbc403f1b807e64a606bb98af0ab60f5302e67</password></server></servers><mirrors><mirror><id>nexus</id><mirrorOf>central</mirrorOf><url>http://maven.aliyun.com/nexus/content/groups/public/</url></mirror></mirrors><profiles><profile><id>github</id><repositories><repository><id>github</id><name>GitHub OWNER Apache Maven Packages</name><url>https://maven.pkg.github.com/cuteJ/ot-server-parent</url><releases><enabled>true</enabled></releases><snapshots><enabled>true</enabled></snapshots></repository></repositories></profile></profiles><activeProfiles><activeProfile>github</activeProfile></activeProfiles></settings> -
Git Download
-
全局配置
123git config --global user.name <your name>git config --global user.email <your_email@example.com> -
建议配置
- crlf
123456# windows系统git config --global core.autocrlf true# mac系统git config --global core.autocrlf inputgit config credential.helper store
-
-
开发工具 intellij idea
-
数据库(选择相应平台安装安装) Mysql
-
安装NodeJs Download
1234# 显示版本则安装成功➜ ~ npm -v5.6.0
启动项目
-
下载前后端项目
12git clone https://github.com/cuteJ/shop-server.git -
创建数据库并初始化数据
12345# 项目install 目录下两个文件shop-server/install/sql---- db.sql // 创建数据库和用户---- data.sql // 项目表结构和初始化数据 -
启动后端项目(maven.pkg.github.com下载有点慢,请有心理准备😓)
12345➜ ~ cd shop-server➜ ~ mvn clean install➜ ~ cd shop-server-mgt➜ ~ mvn spring-boot:run -
安装启动前端
12345git clone https://github.com/cuteJ/shop-web-mgt.gitcd shop-web-mgtnpm install --registry=https://registry.npm.taobao.orgnpm run dev
如何打包部署
-
后端 shop-server
12345cd shop-servermvn clean package# 拷贝到运行目录shop-server/shop-server-mgt/shop-server-mgt.jar 启动脚本(shop-server/install/shell/execute.sh)
123456789101112131415161718192021222324252627282930313233343536373839404142434445464748495051525354555657585960616263646566676869707172737475767778798081828384858687888990919293949596979899100101102103104#!/bin/bash -# 数据库配置#export MYSQL_URL=127.0.0.1:3306#export MYSQL_USER=cuteJ_shop#export MYSQL_PASSWORD=cuteJ_shop123# 应用配置#export SERVER_PORT=8300#export SERVER_CONTEXT_PATH=/shop# 管理后台Session超时时间(单位秒)#export SERVER_SESSION_TIMEOUT=1800# 服务异常响应形式:always: 返回全部的堆栈信息(一般在debug,开发测试环境使用)never:返回友好提示#export SERVER_ERROR_MODE=always# 跨域配置,也可以在nginx 配置#export APP_CORS_ORIGIN: http://localhost:9527#Jwt C端API 认证配置#export JWT_HEADER=Authorization#export JWT_SECRET=abkfdsfooi0934# token失效时间(单位秒)#export JWT_EXPIRATION=86400# oss 可选(aliyun|huawei)#export APP_OSS_KEY=xxx#export APP_OSS_SECRET=xxx#export APP_OSS_ENDPOINT=xxx#export APP_OSS_URL=xxx#export APP_OSS_BUCKET=xxx# Linux 路径MS_HOME=/data/cuteJ/serverMS_JAR=shop-server-mgt.jar #APP_NAME=shop-server-mgt #JAVA_OPTS="-Dspring.profiles.active=prod -Xms1g -Xmx4g -XX:MaxMetaspaceSize=256m -XX:+UseG1GC";MS_PID=`ps fax|grep java|grep "${MS_JAR}"|awk '{print $1}'`export MS_PID;# Function: startstart() {pid=${MS_PID}if [ -n "${pid}" ]; then {echo "${APP_NAME} Service is already running (pid: ${pid})";}else {# Start screener msecho "Starting ${APP_NAME} service";cd ${MS_HOME}nohup java ${JAVA_OPTS} -jar ./${MS_JAR} > /dev/null 2>&1 &} fi;# return 0;}# Function: stopstop() {pid=${MS_PID}if [ -n "${pid}" ]; then {echo -ne "Stopping service module";kill -15 ${pid}sleep 5pid=`ps fax|grep java|grep "${MS_JAR}"|awk '{print $1}'`if [ ${pid} ]; then {echo 'Kill Process!'kill -9 ${pid}}else {echo "${APP_NAME} stop success."} fi;}else {echo "${APP_NAME} service is not running";} fi;#return 0;}# Main Codecase $1 instart)start;;;stop)stop;;;restart)stop;sleep 1;start;;;status)pid=${MS_PID}if [ "${pid}" ]; then {echo "${APP_NAME} service is running with pid: ${pid}";}else {echo "${APP_NAME} service is not running";} fi;;;esacexit 0;1234./execute.sh start # 启动应用./execute.sh stop # 停止应用./execute.sh status # 查看应用状态 -
前端 shop-web-mgt
安装 nginx Download
12345678910111213141516171819202122232425262728293031#配置server {listen 80;server_name www.xxxx.com;proxy_set_header Host $host;proxy_set_header x-auth-token $http_x_auth_token;proxy_set_header X-Forwarded-For $remote_addr;proxy_set_header Authorization $http_authorization;proxy_pass_header Authorization;location / {# shop-web-mgt 打包后 dist文件root /www/shop-web-mgt; add_header Cache-Control "private, no-store, no-cache, must-revalidate, proxy-revalidate";index index.html index.htm;}location /shop/ {proxy_set_header Host $host;proxy_set_header Cookie $http_cookie;proxy_set_header Referer $http_referer;proxy_set_header X-Real-IP $remote_addr;proxy_set_header X-Forwarded-For $proxy_add_x_forwarded_for;proxy_pass_header Server;proxy_http_version 1.1;proxy_set_header Connection "";proxy_pass http://127.0.0.1:8300/shop/;#expires 0;}}12345# 配置接口地址shop-web-mgt/config/prod.env.jsnpm run build:prod# 拷贝 dist 目录下的文件到nginx下面
接入开发及规范
-
后端
-
基础数据初始化
文件目录
12345678shop-server-mgt/com.onlythinking.shop.initDicsInitializer (常量初始化)ApisInitializer (常量初始化)MenusInitializer (菜单初始化)AdminInitializer (管理员初始化)GrantInitializer (管理员授权)DBMetaInitializer (数据库表结构数据)执行初始化(注意:会删除之前的数据)
123mvn -Pdev spring:bootcurl http://127.0.0.1:8300/shop/api/insecure/re_init -
Mybatis 生成实体Mapper
https://github.com/cuteJ/ot-mybatis-generator (可根据自身项目情况定制生成器)
目录 shop-server-api
配置如下文件 generatorConfig.properties,generatorConfig.xml
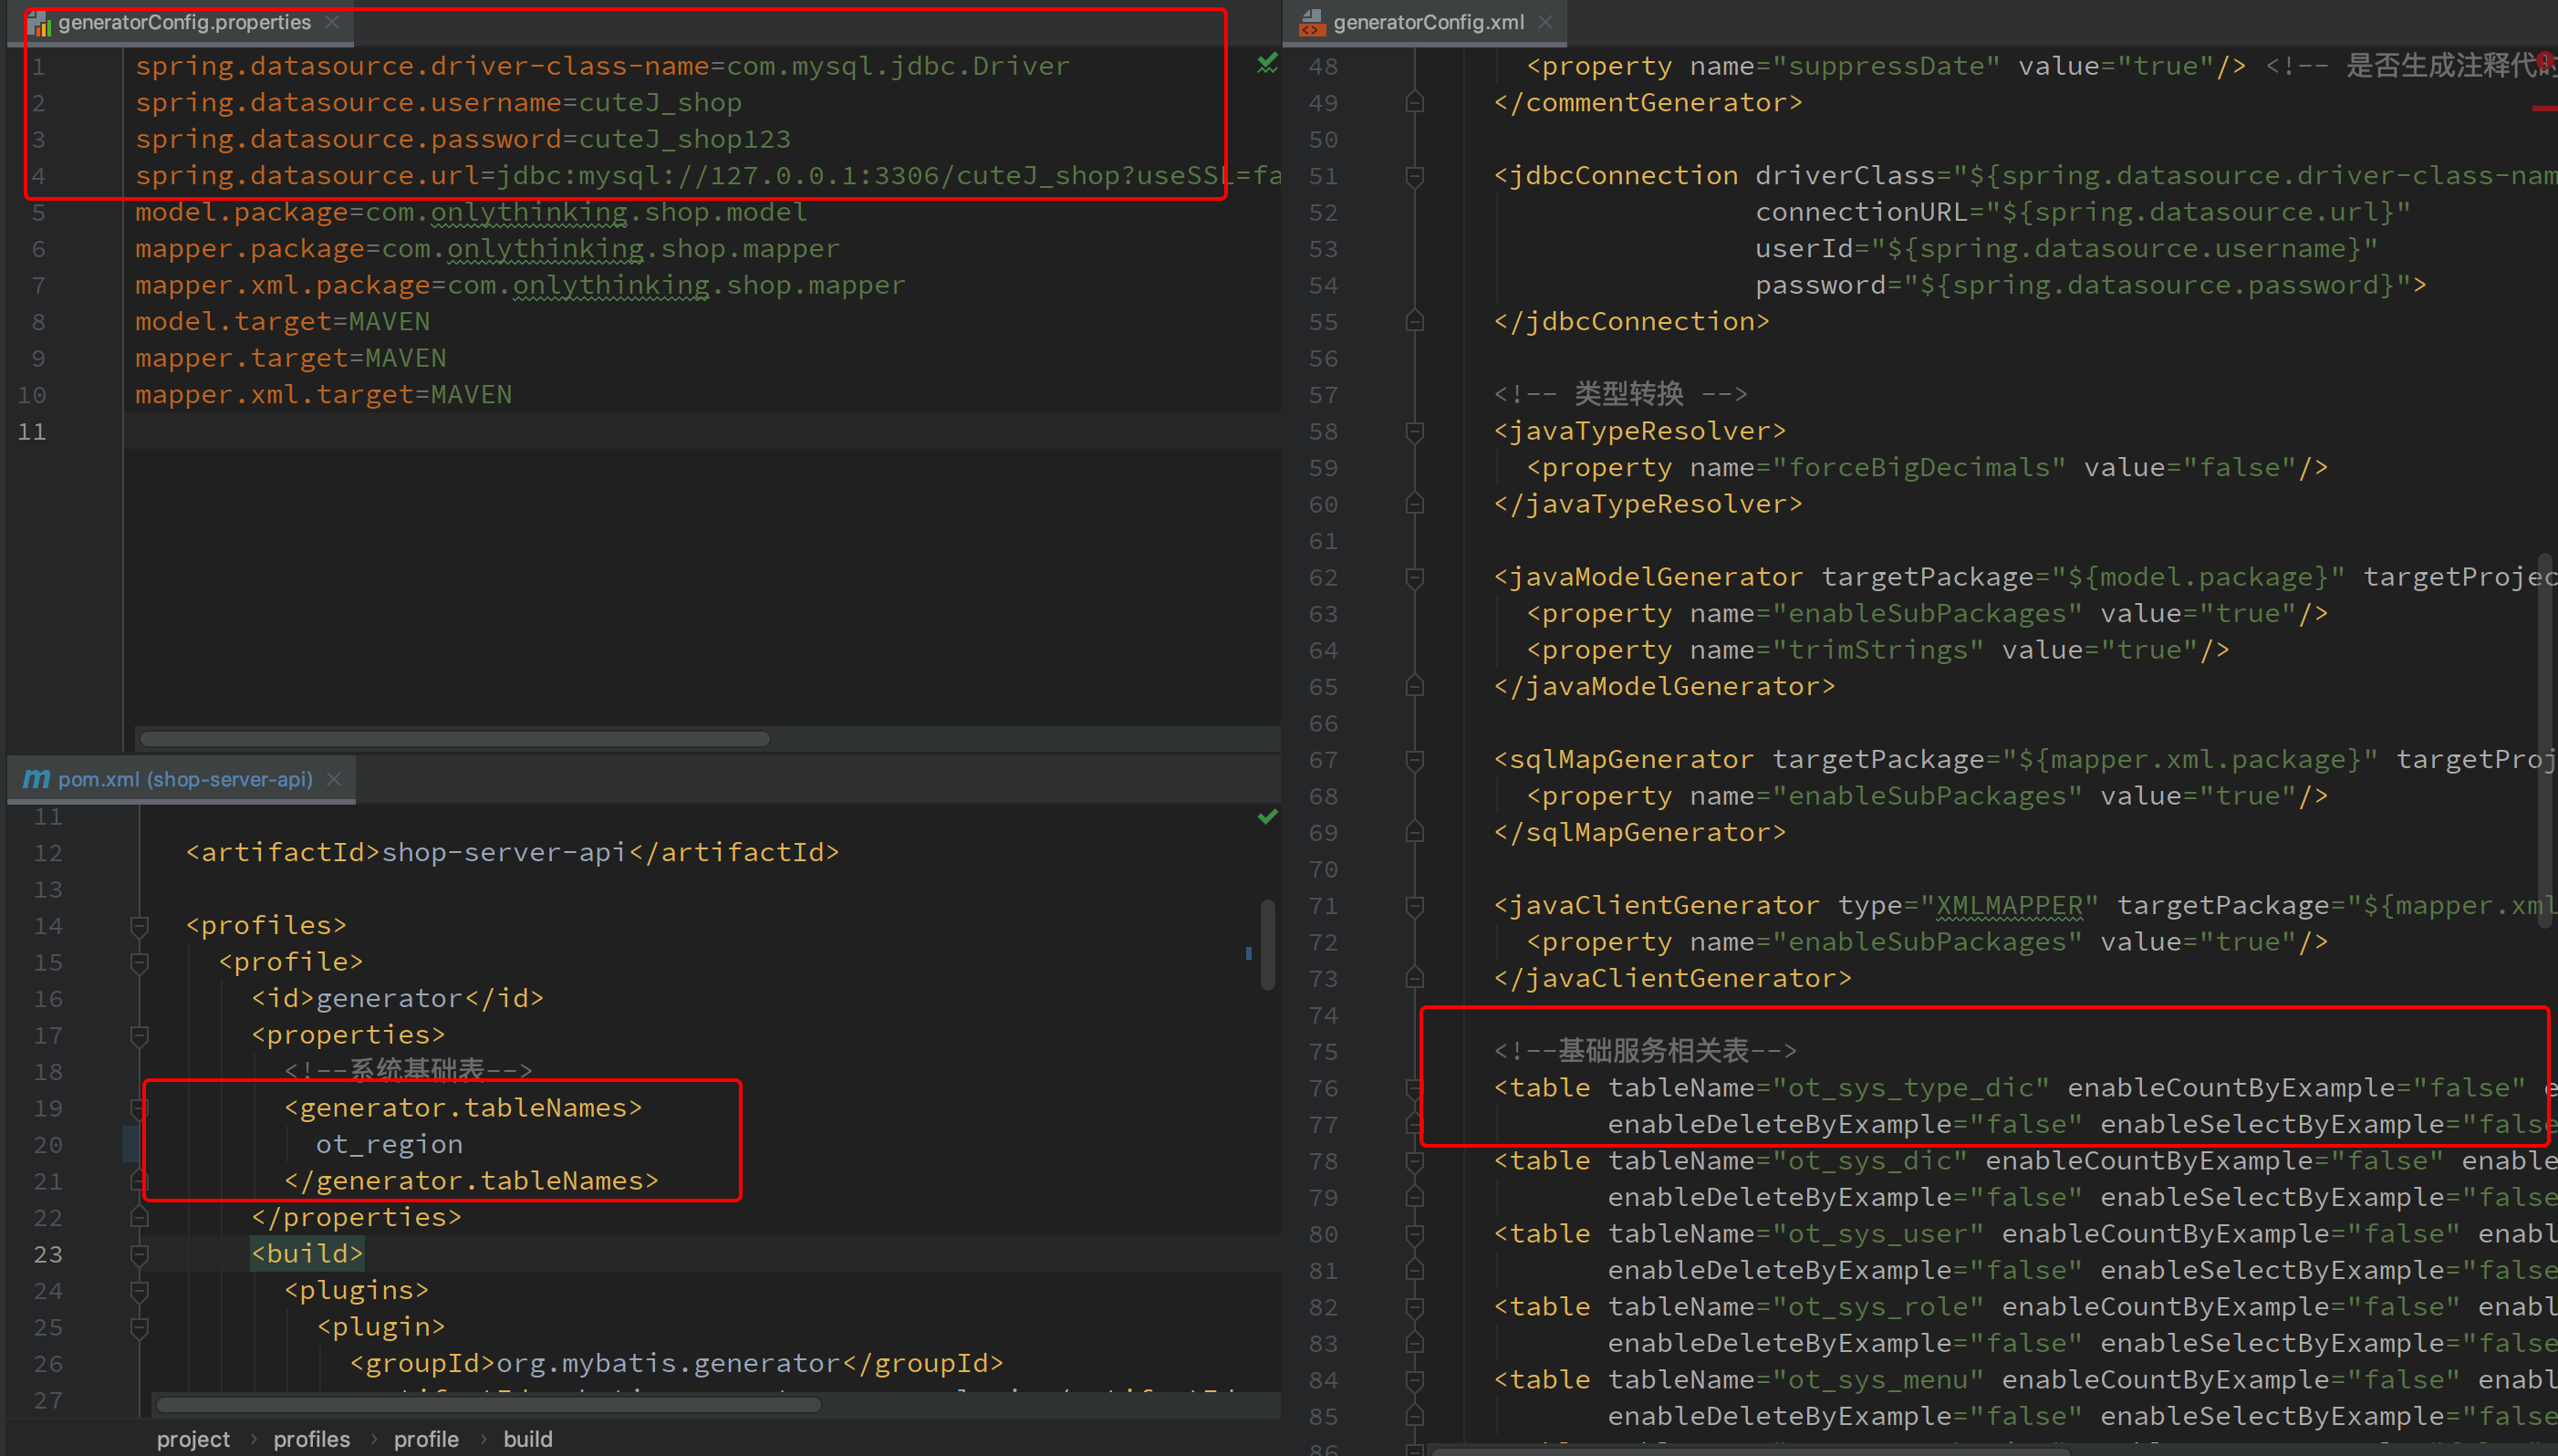 12mvn -Pgenerator clean install
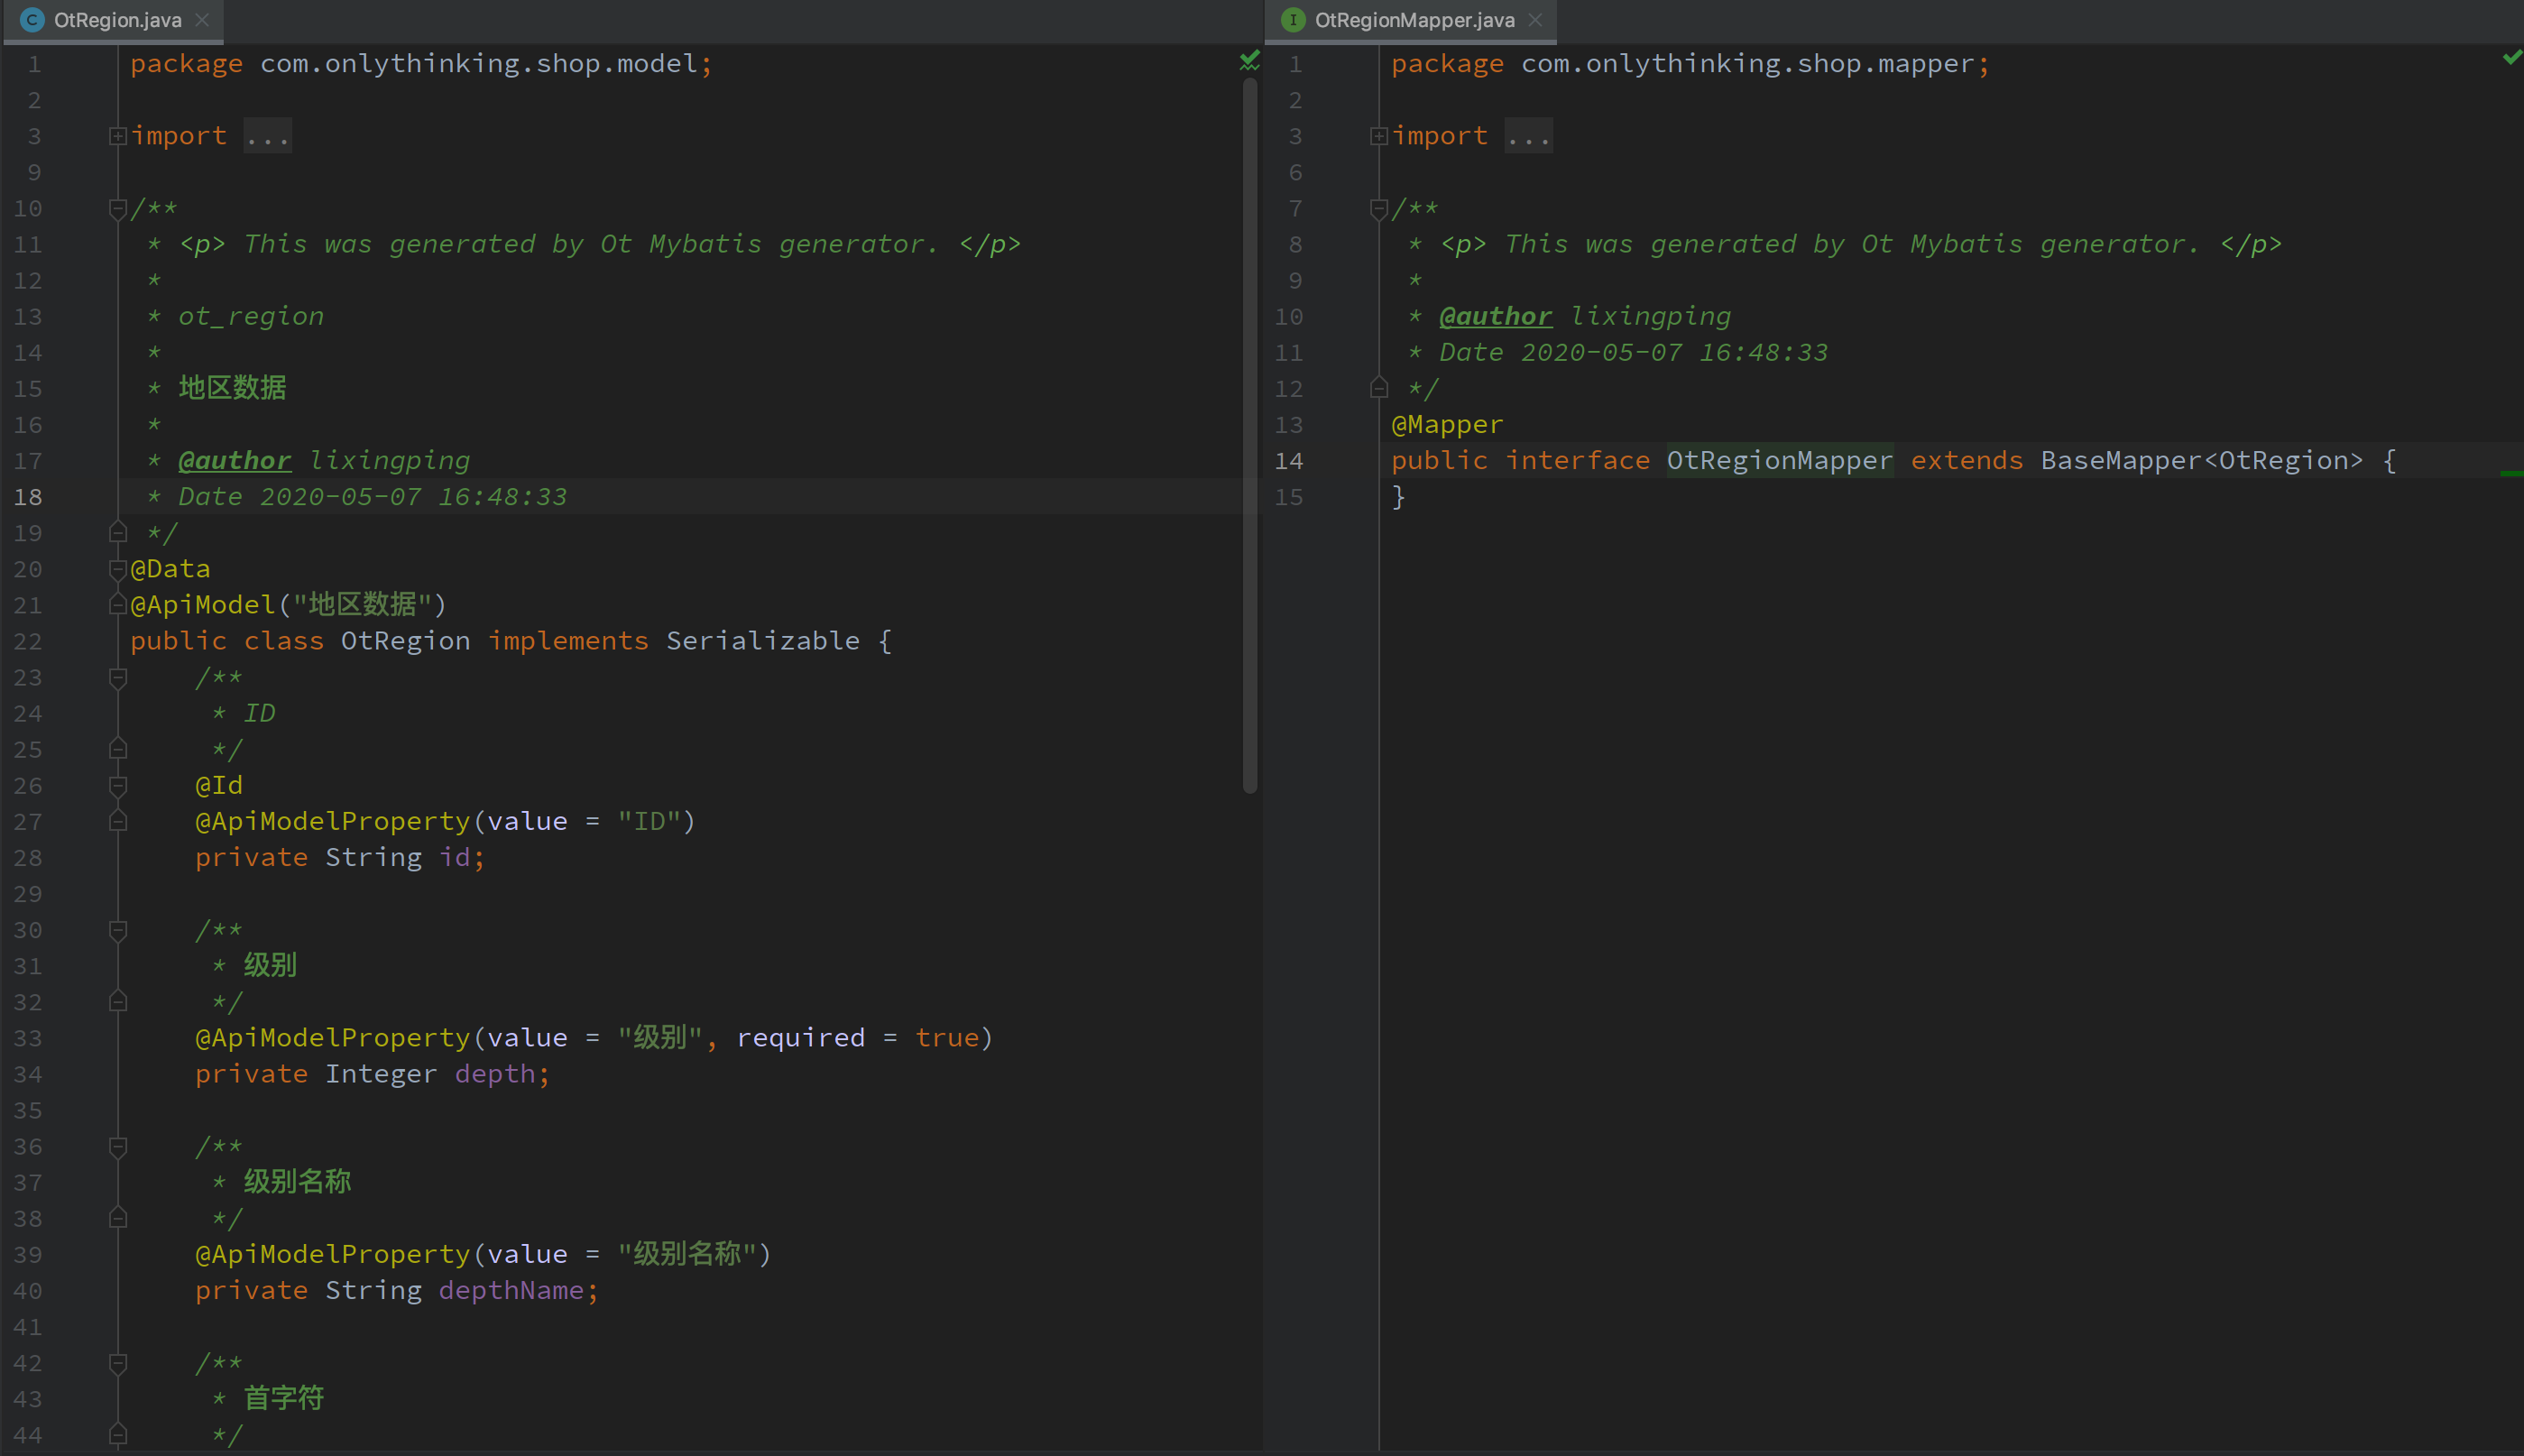
-
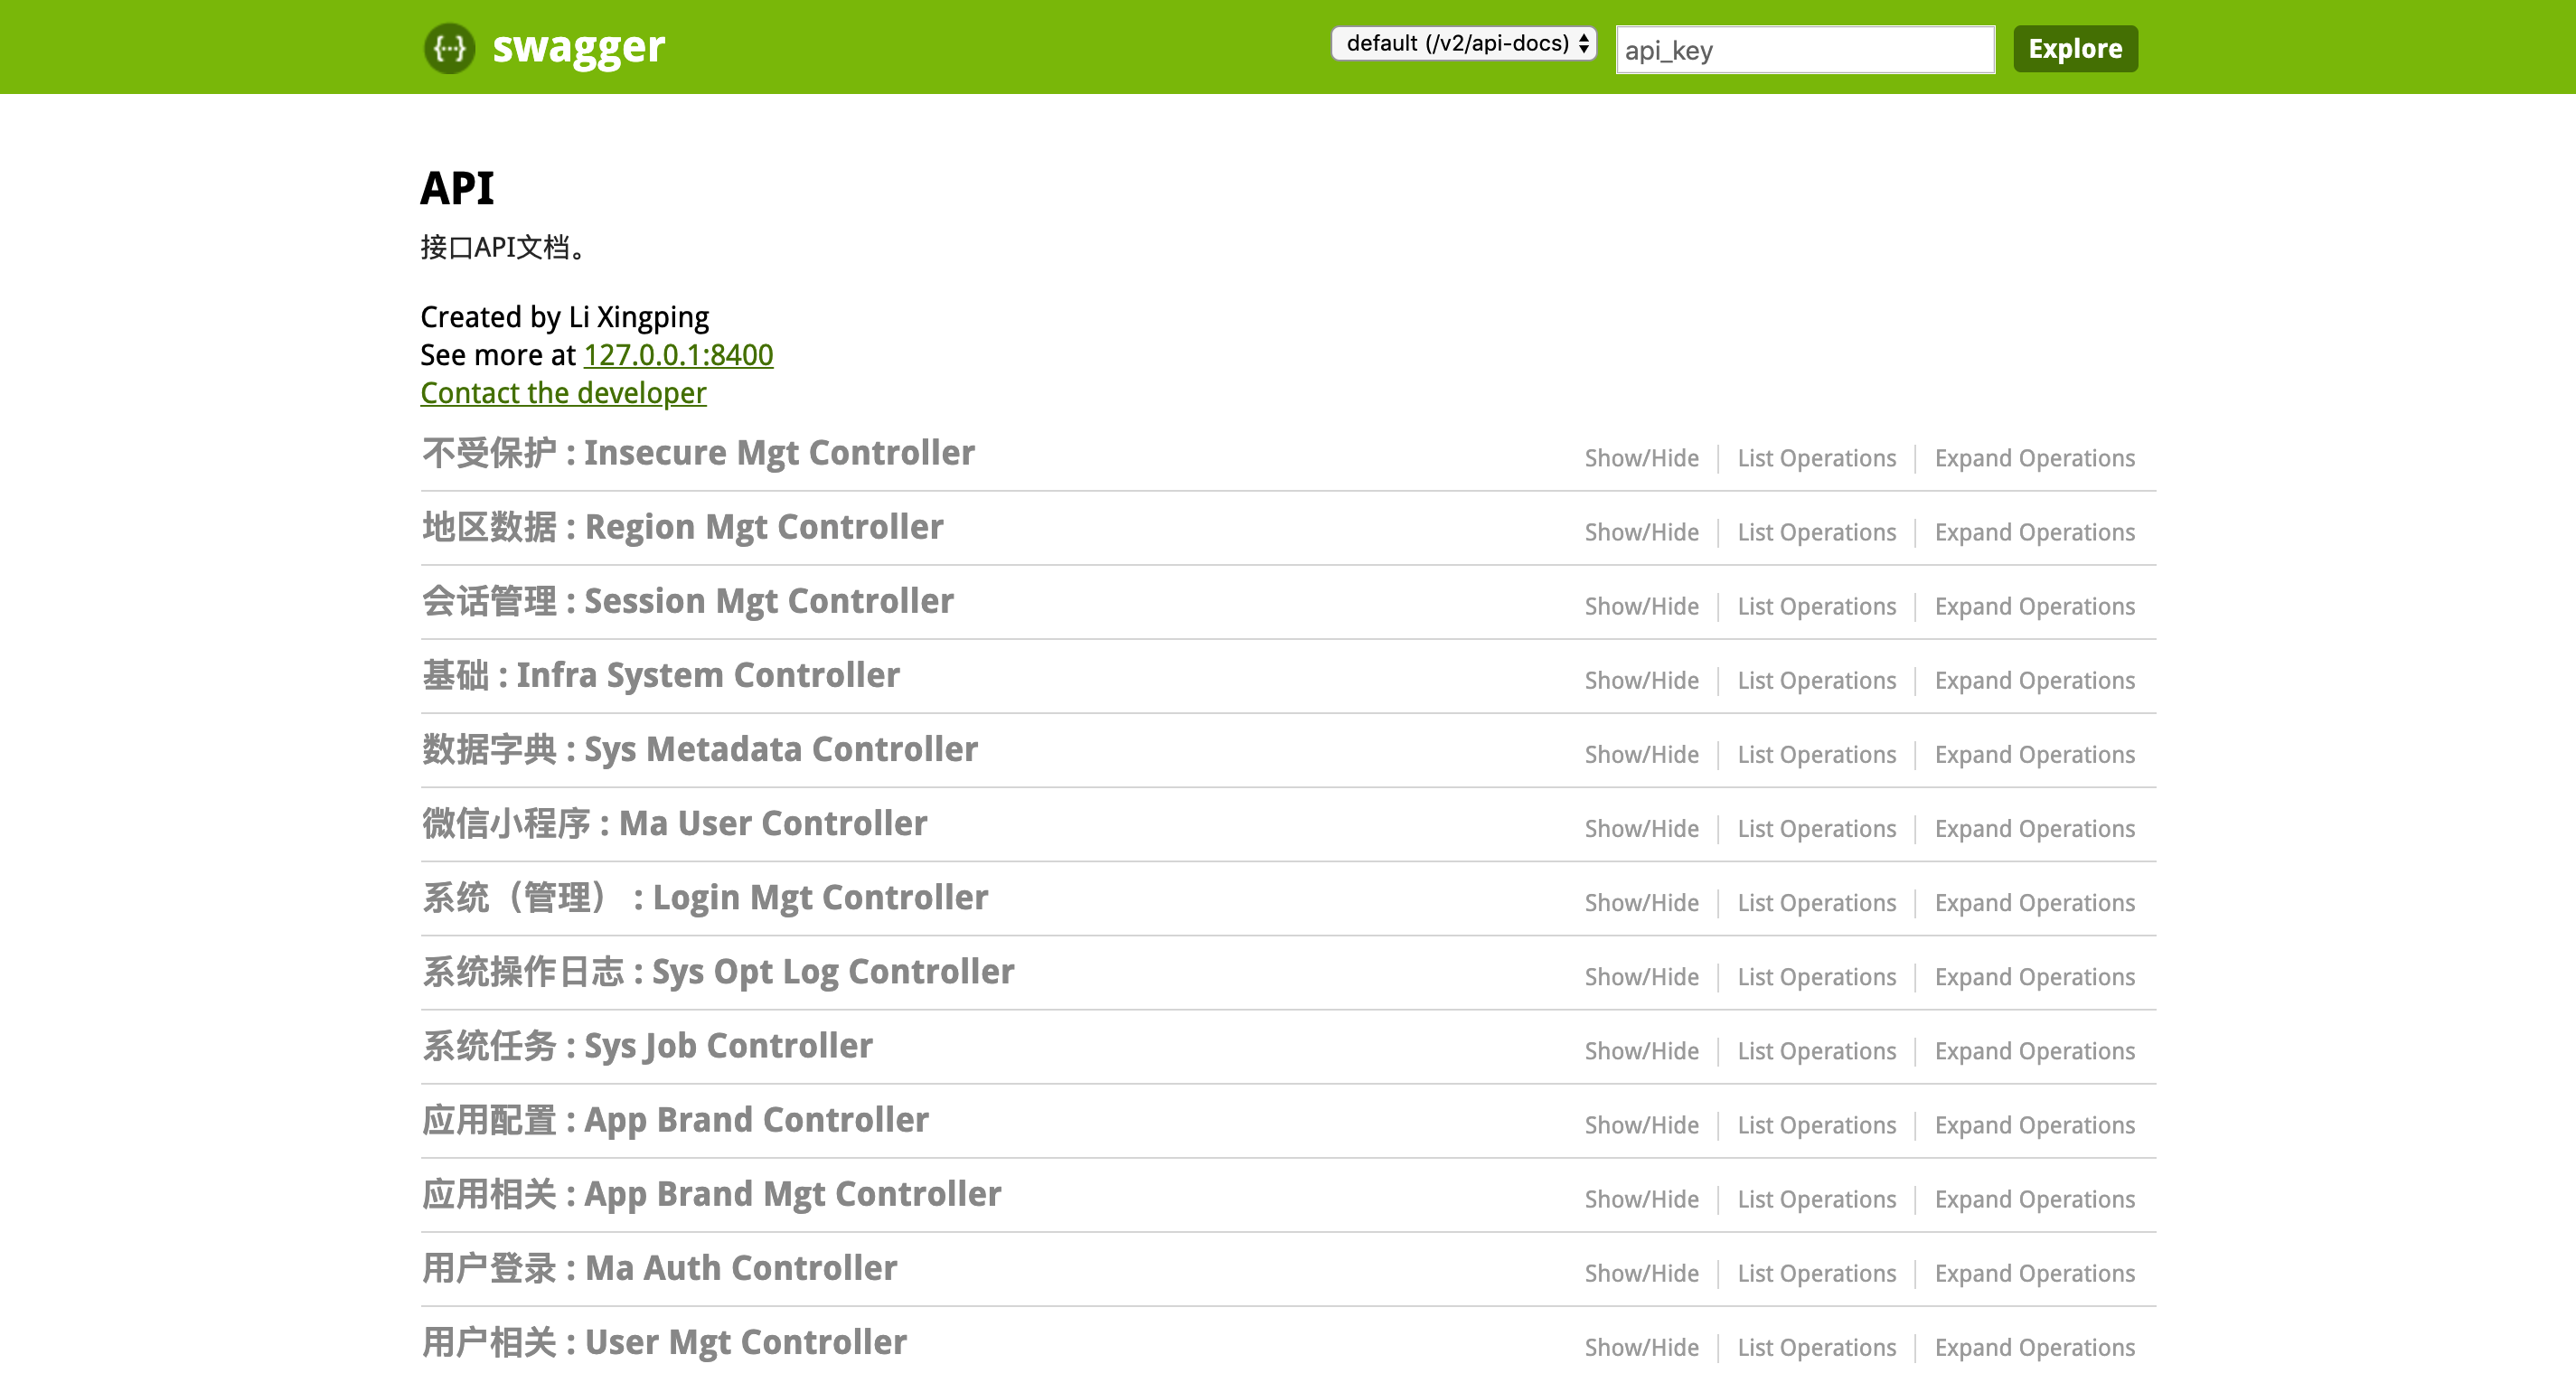
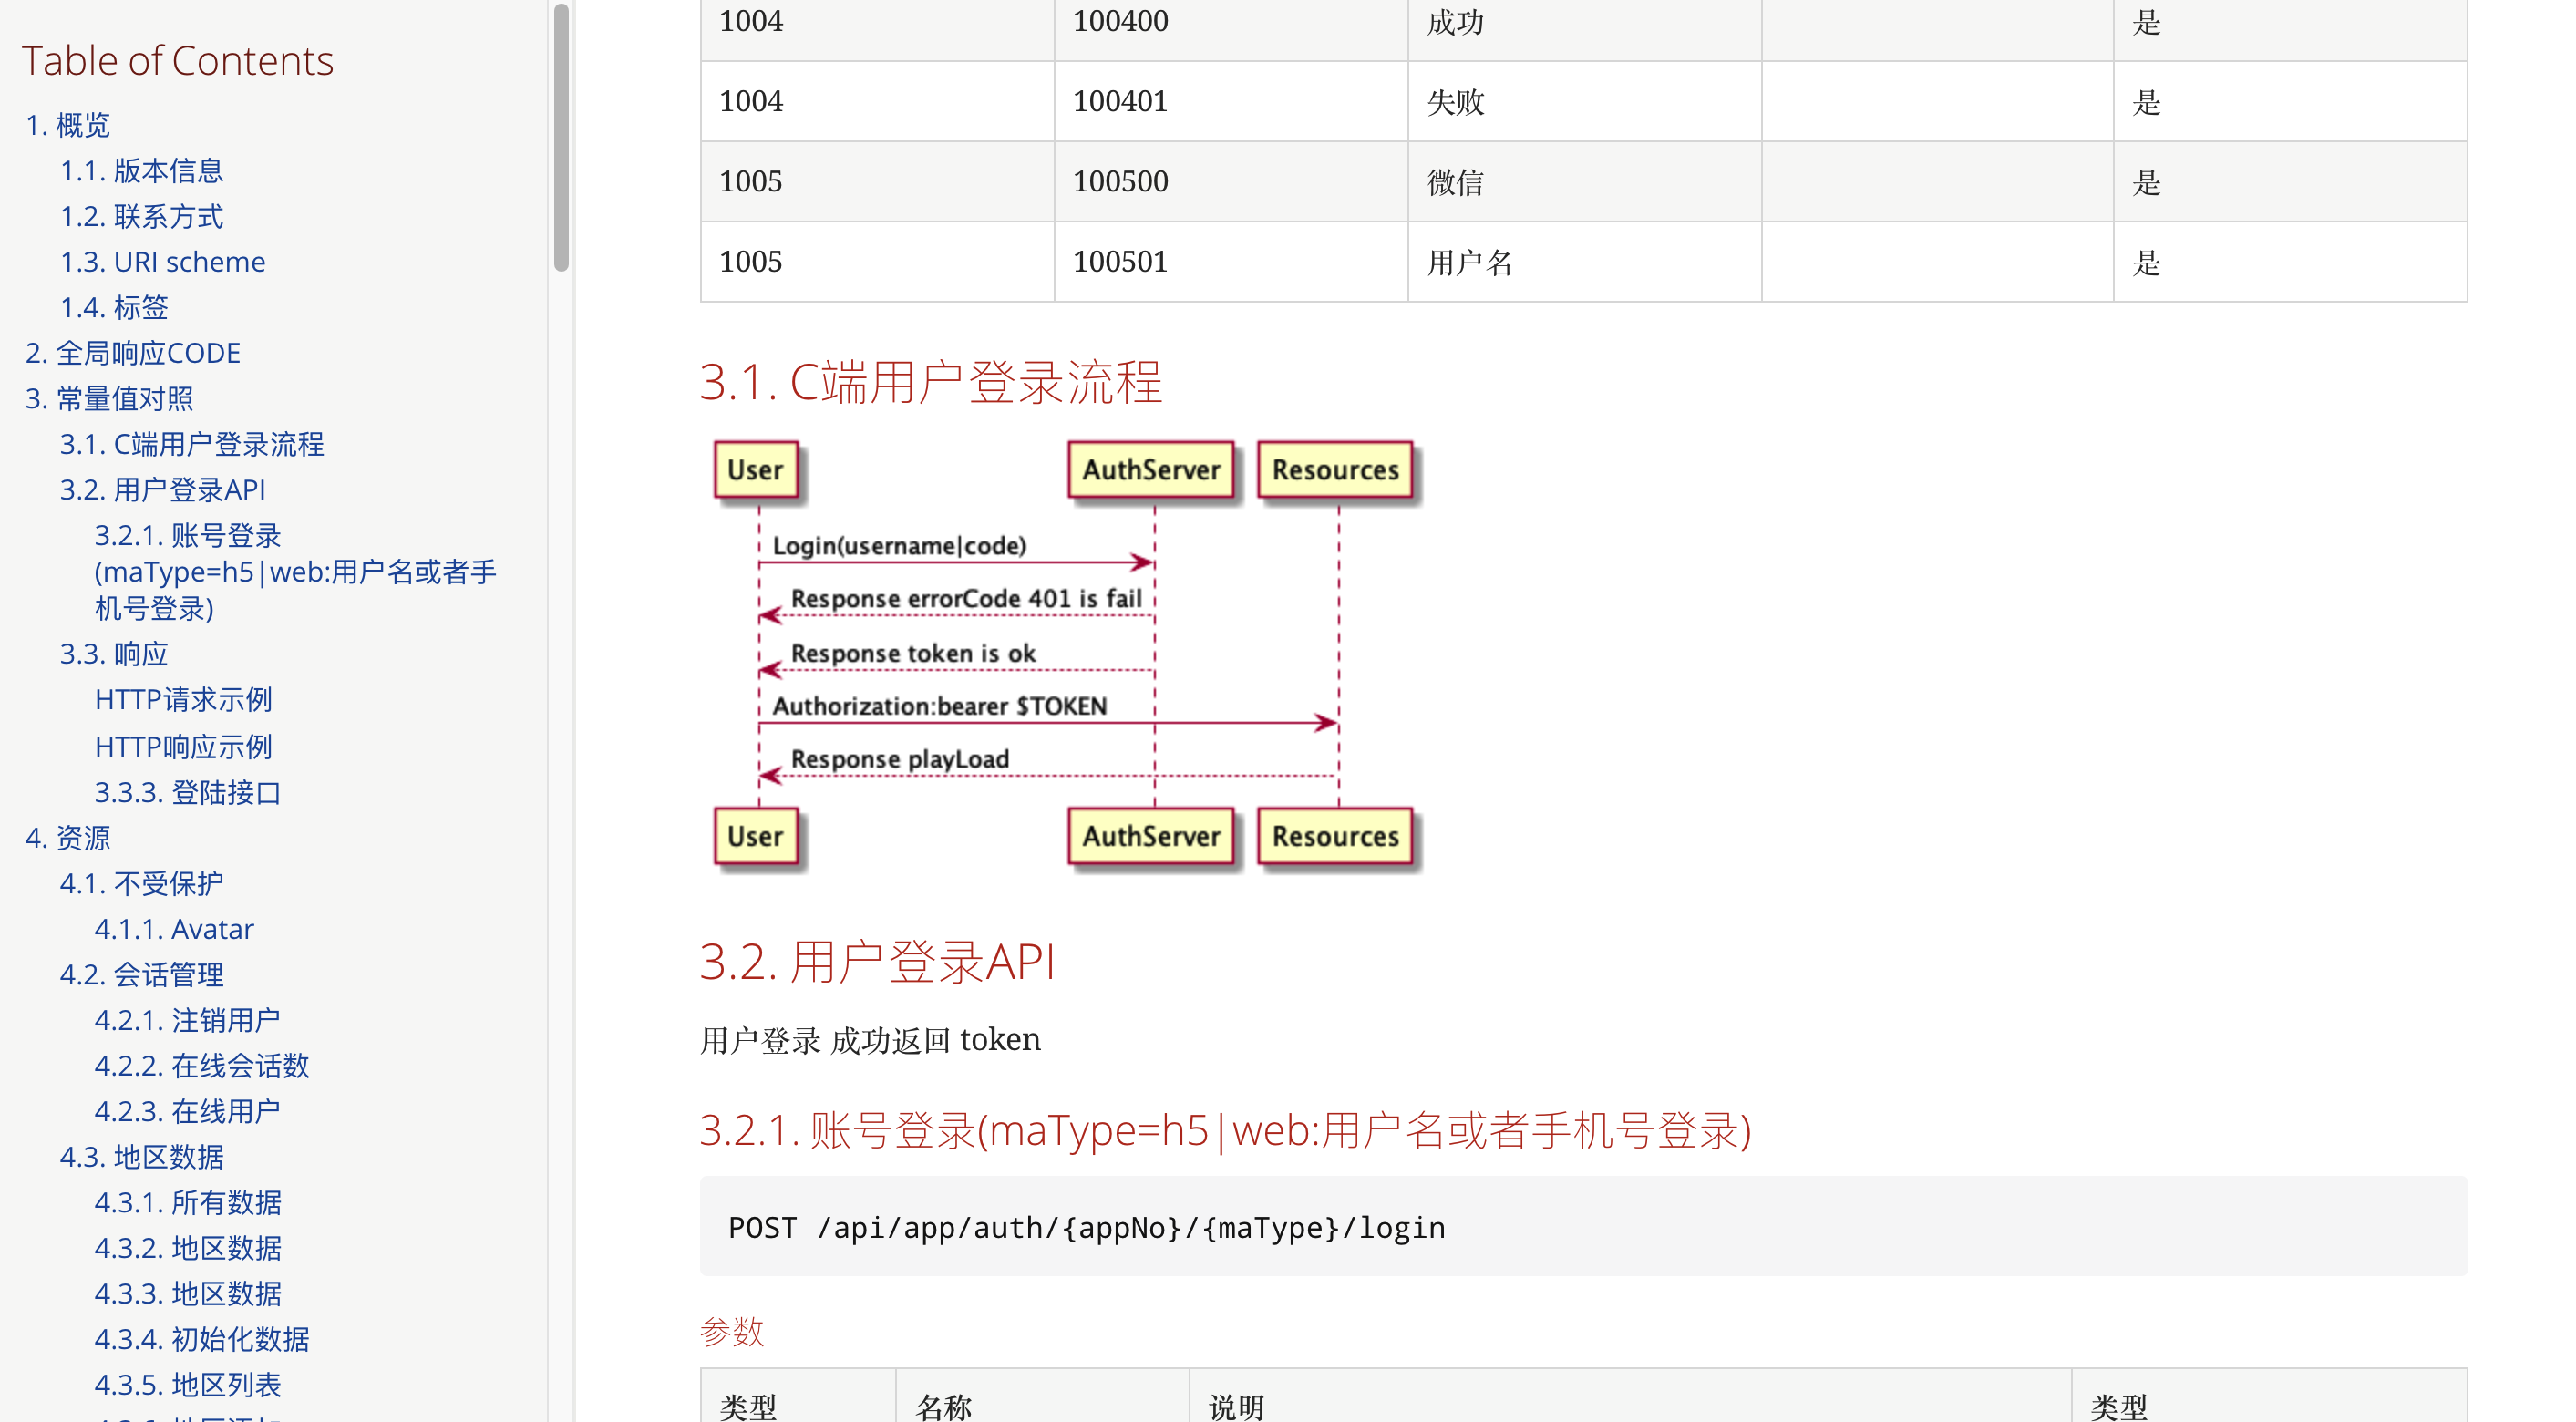
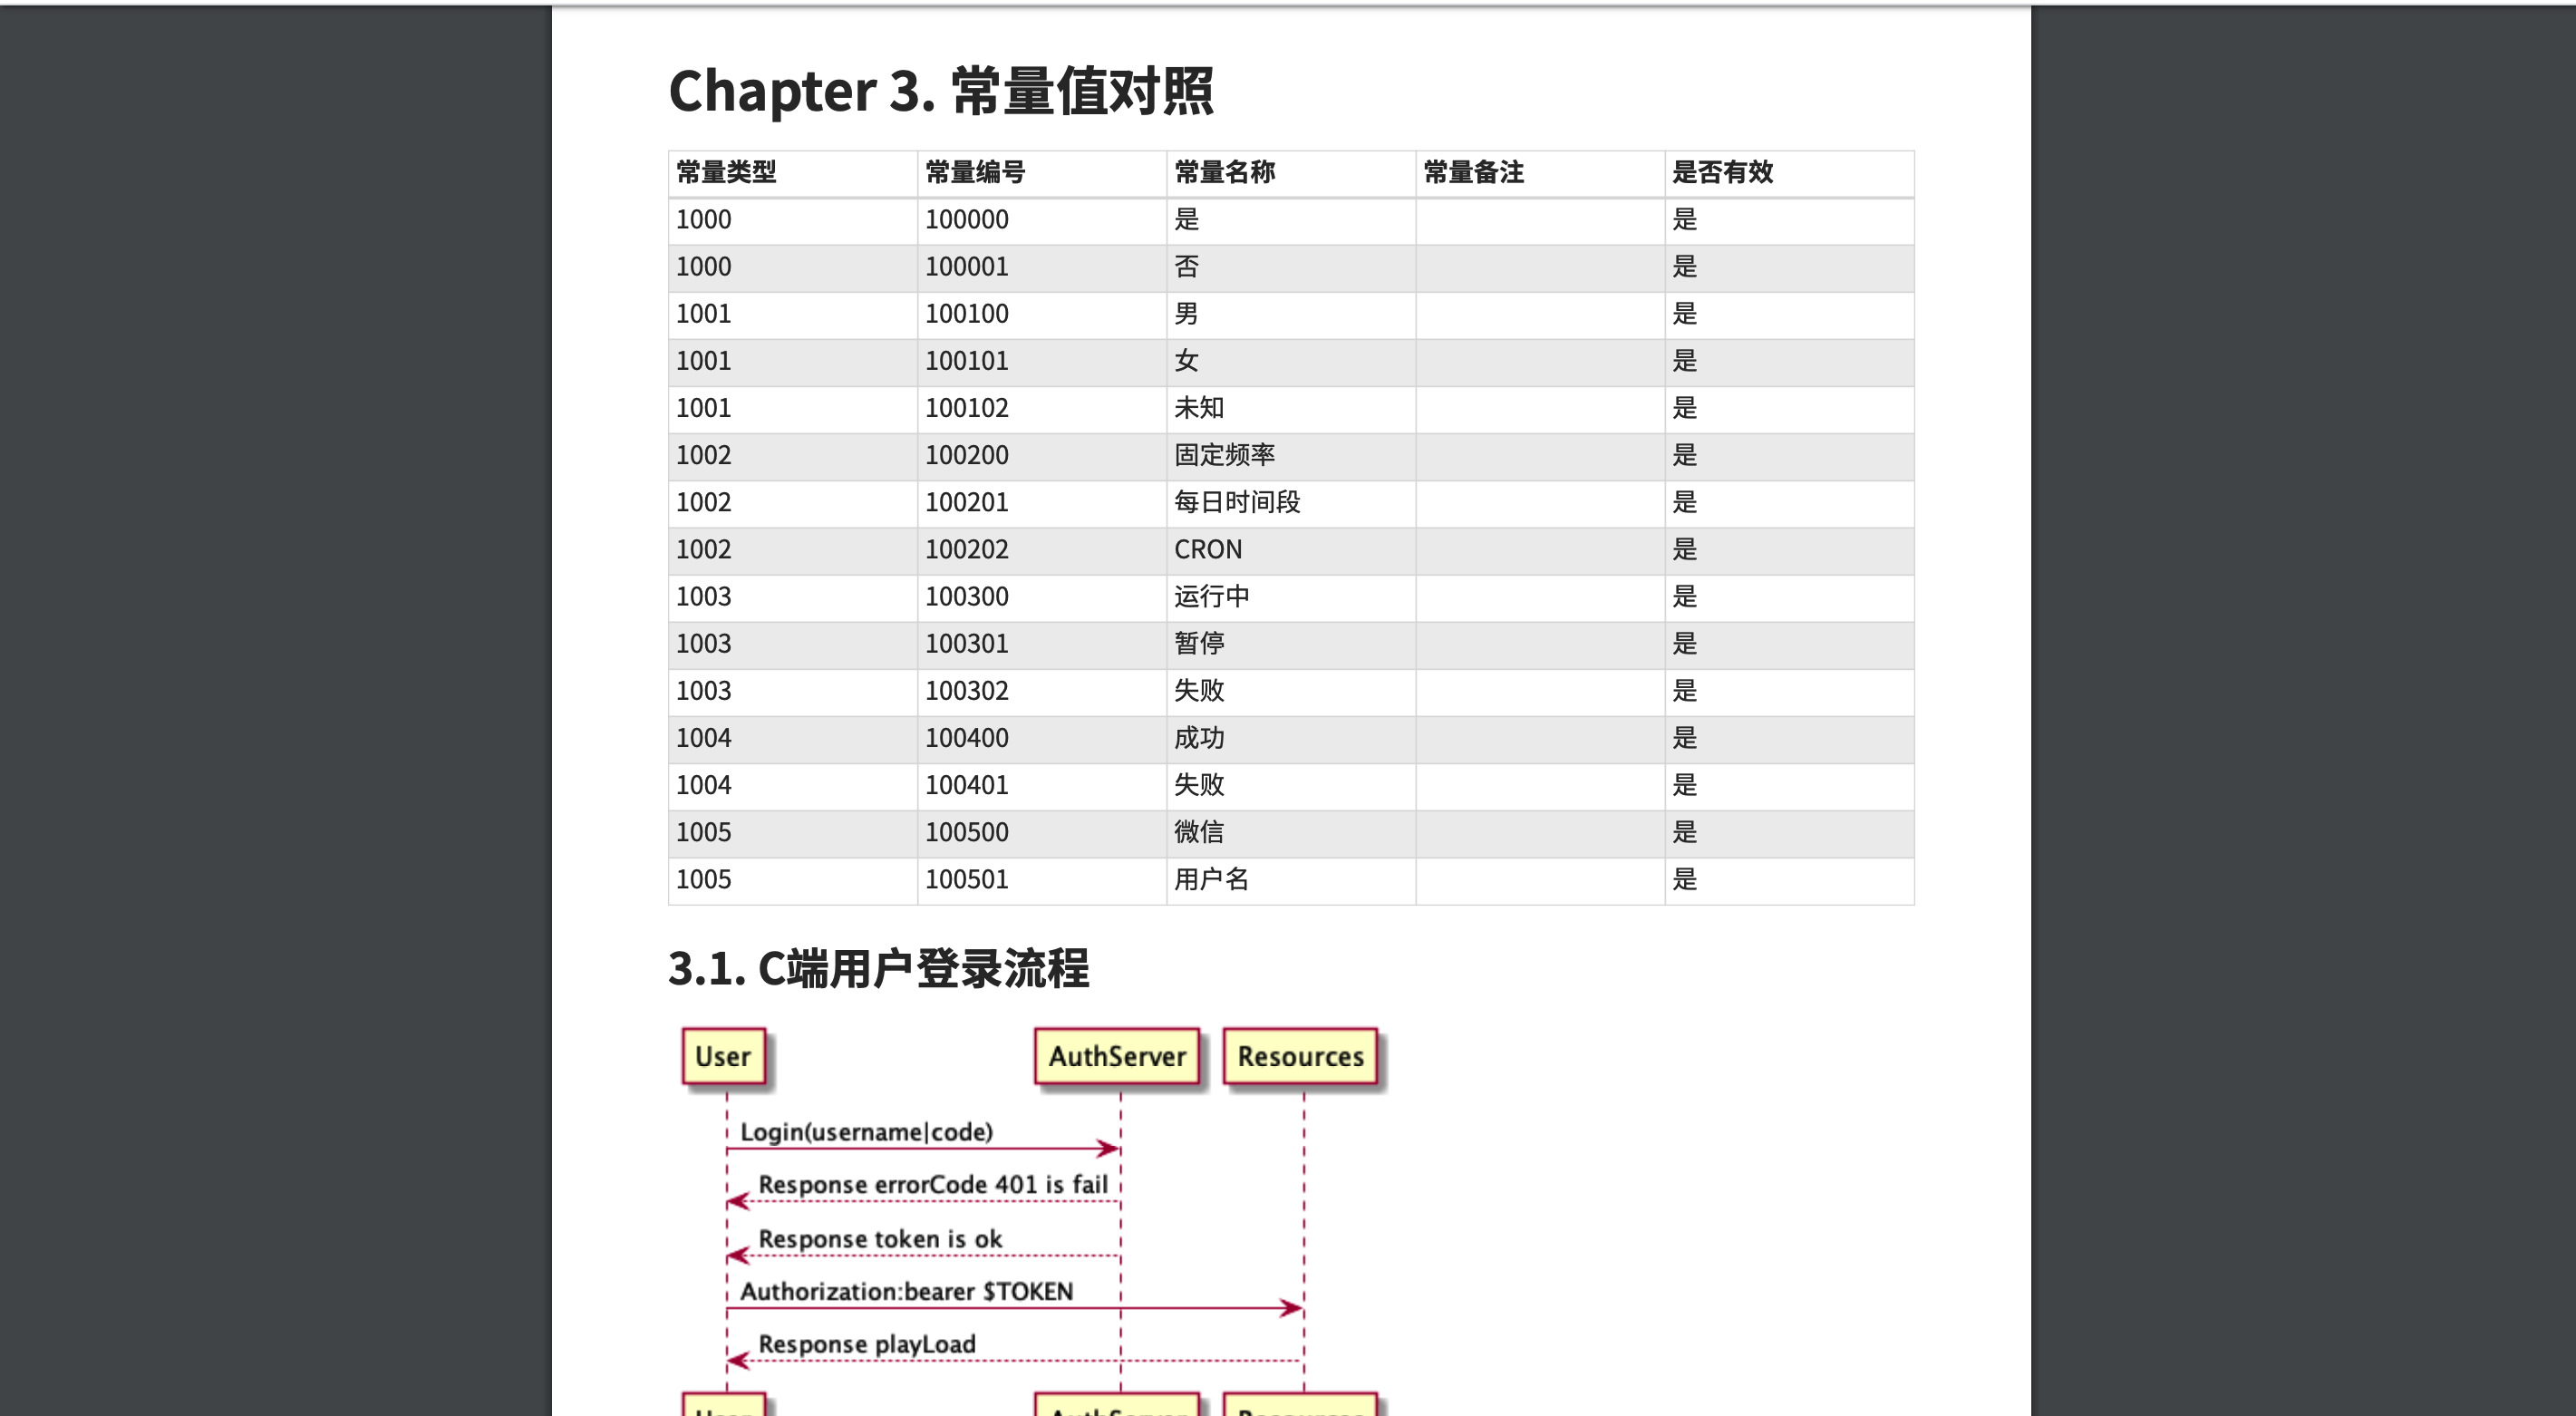
API文档的生成
12mvn -PapiDcos clean install定制化内容可在以下目录
shop-server-mgt/src/docs/asciidoc 添加adoc文件
生成Html和PDF两种格式文档
生成截图:
-
响应异常处理
项目统一响应式异常为com.onlythinking.commons.exception.RespondedException
errorCode用法:如Token失效,接口校验约束异常等。
-
国际化处理
原则上除代码注释外项目里面不应该有中文
国际化文件目录:shop-server-mgt/src/main/resources/i18n
12345678// 方式一private final MessageSource messageSource;String message = messageSource.getMessage("mgt.entity.null", null)// 异常类if (StringUtils.isBlank(msg)) {throw RespondedException.argumentInvalid("{mgt.entity.null}");} -
接口URL规范
12345678910111213141516//(因为‘shop-server-app’和'shop-server-mgt'合并为一个应用启动,为了方便权限控制添加了/app前缀作为区分| 根据情况也可以拆分为两个应用)/{content-path}/api/app/ //(h5,小程序请求接口)/{content-path}/api/ //(管理后台接口)com.onlythinking.commons.config.annotation.@ApiRest //说明// 如下:@Slf4j@RequiredArgsConstructor(onConstructor = @__(@Autowired))@Api(tags = "用户登录")@ApiRest(serviceId = "app", value = "/auth/{appNo}/{maType}")public class MaAuthController {// controller 的拼接路径为/${content-path}/api/${serviceId}/${value} -
权限的处理
-
shop-server-app
12// H5,小程序请求接口采用jwt 具体查看:com.onlythinking.shop.app.core.security.JwtAuthorizationTokenFilter -
shop-server-mgt
管理端采用Shiro框架
123456789// RequiresPermissions value 规则 (module:domain:action)@ApiOperation("系统角色添加")@RequiresPermissions(value = "sys:role:save")@PostMapping(value = "/role/save")public RespondedBody sysRoleSave(@RequestBody OtSysRole dto) {infraSystemService.saveOrUpdateSysRole(dto);return RespondedBody.successful();}
-
-
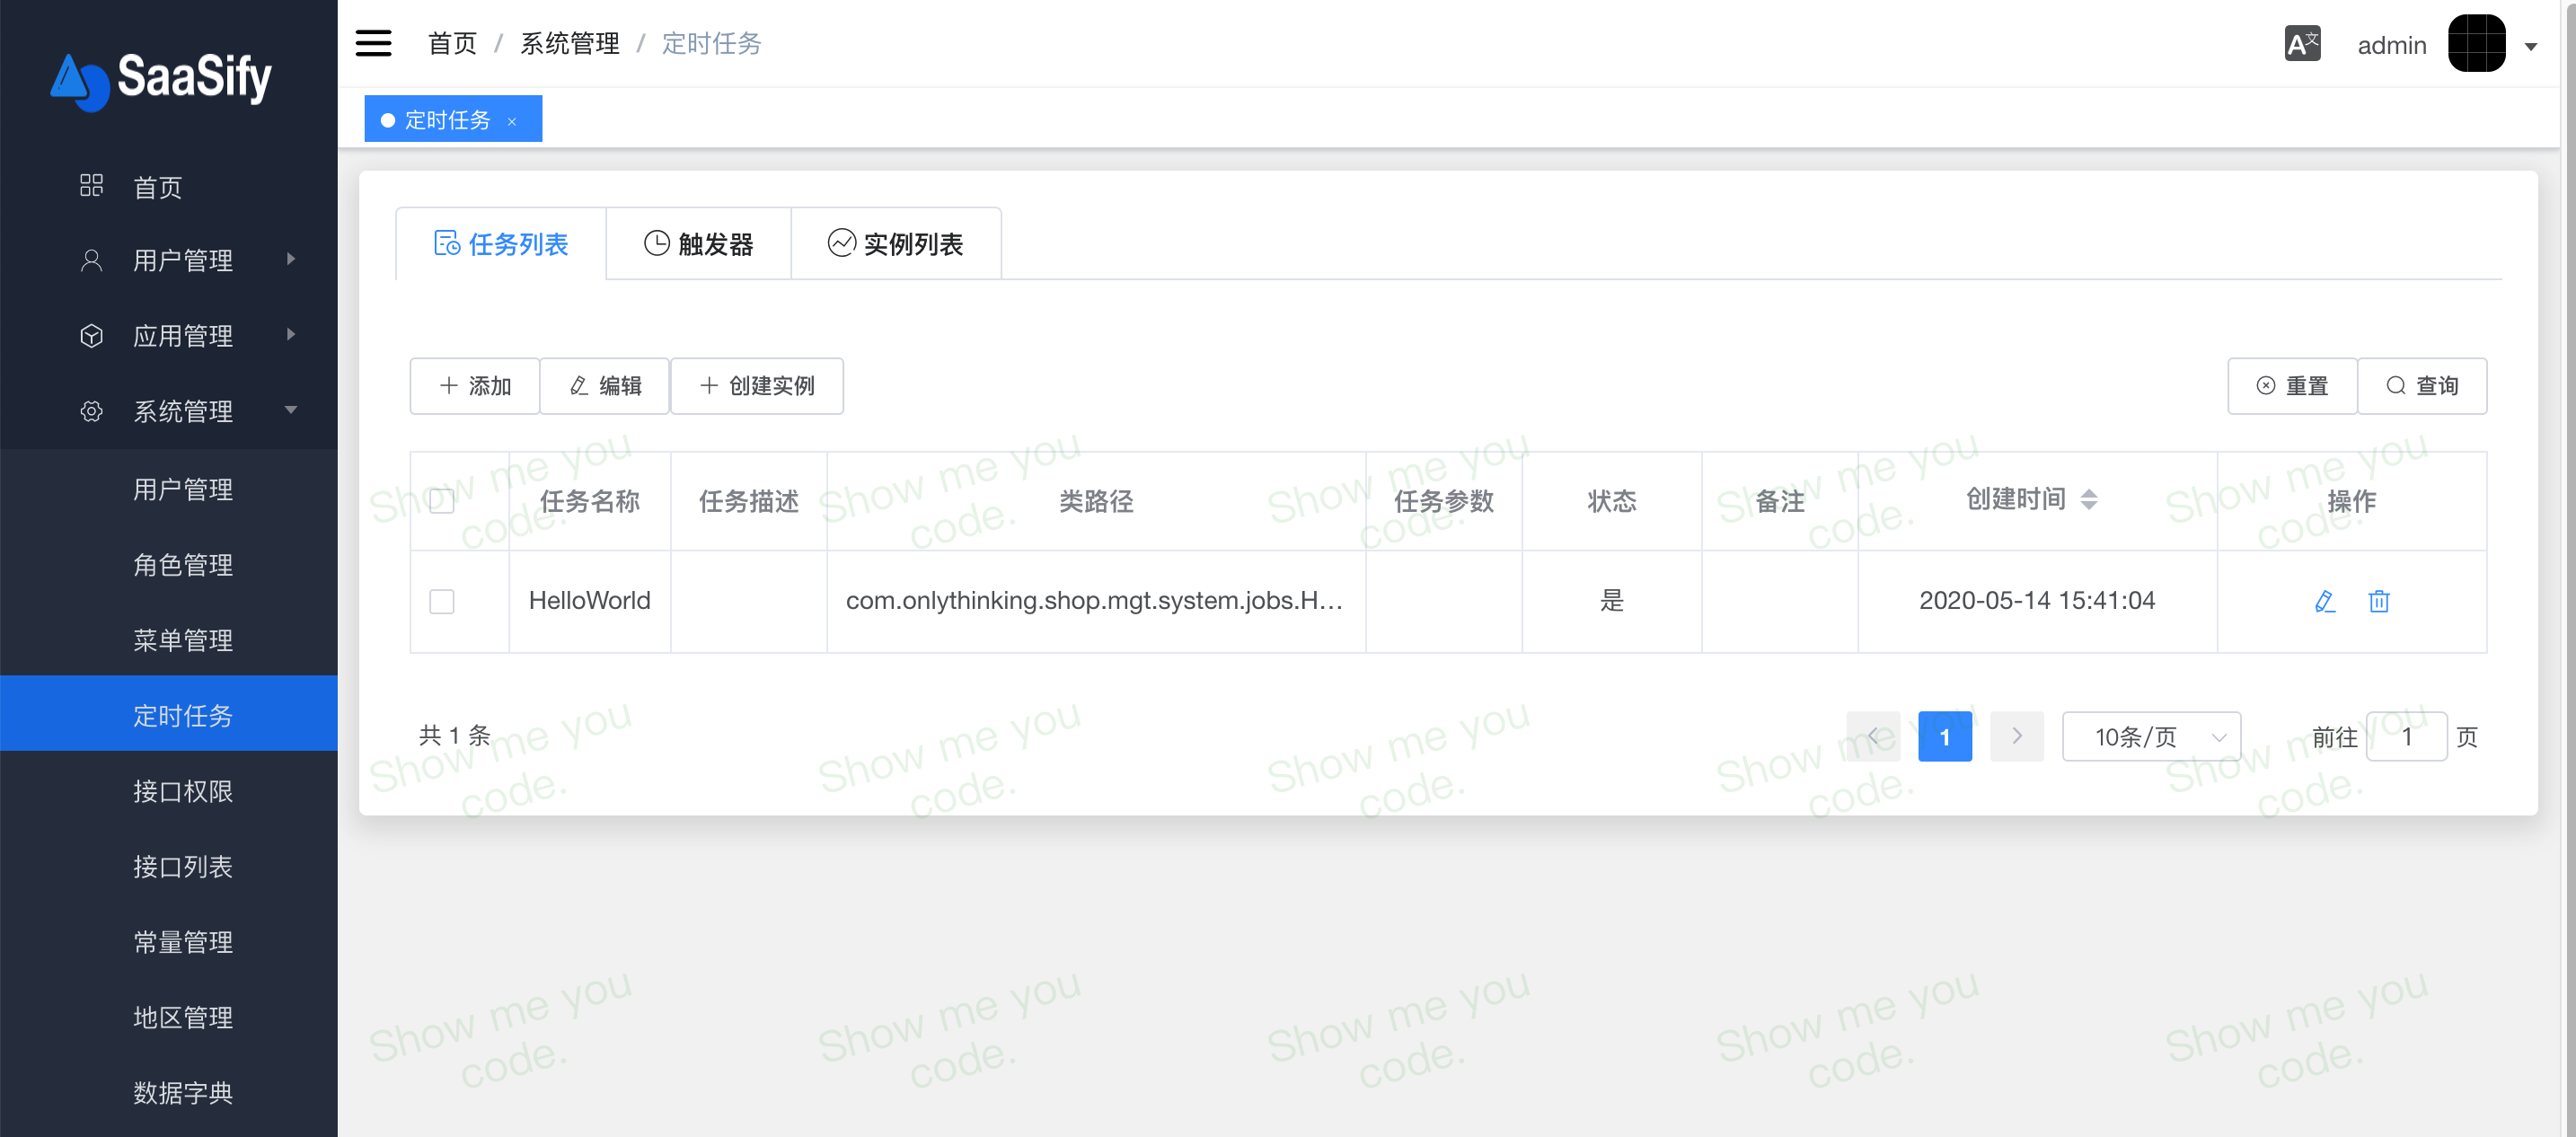
定时任务的开发
-
com.onlythinking.shop.mgt.system.jobs 创建任务
12345678910111213141516171819202122package com.onlythinking.shop.mgt.system.jobs;/*** <p> The describe </p>** @author Li Xingping*/@Slf4j@DisallowConcurrentExecutionpublic class HelloWordJob implements Job {@Overridepublic void execute(JobExecutionContext context) {String instanceId = context.getMergedJobDataMap().getString("instanceId");log.info("Job [{}] running ", instanceId);log.info("Hello world");if (new Random().nextInt(20) % 2 == 0) {throw RespondedException.argumentInvalid("执行任务参数错误");}}} -
后台系统=》定时任务创建模版和触发器启动实例
-
-
-
前端
-
目录结构
1234567891011121314151617181920212223242526272829303132333435src -- 源码目录├── api -- API├── assets -- 图片资源文件├── components -- 通用组件├── directive -- vue指令├── filters -- 过滤器├── lang -- 国际化配置├── icons -- svg文件├── router -- 路由配置├── store -- vuex状态管理├── styles -- 全局css样式├── utils -- 工具类└── views -- 页面组件├── app -- 应用管理(小程序)├── dashboard -- 首页├── errorPage -- 错误页面├── layout -- 布局页面├── login -- 登录页├── profile -- 个人配置├── svg-icons -- 图标├── system -- 系统管理├── components -- 页面级别组件├── sysApiListManager -- 接口列表├── sysAuthorityManager -- 接口权限├── sysDicManager -- 常量管理├── sysJobManager -- 定时任务├── sysJobRunLogManager -- 定时任务日志├── sysMenuManager -- 菜单管理├── sysMetadataManager -- 数据字典├── sysOptLogManager -- 操作日志├── sysRegionManager -- 地区管理├── sysRoleManager -- 角色管理├── sysUserManager -- 系统用户管理├── user -- C端用户管理├── userLoginManager -- C端用户列表 -
常量值的处理
常量值比如:性别,状态为了适配国际化和特殊字符处理制定一套映射表。
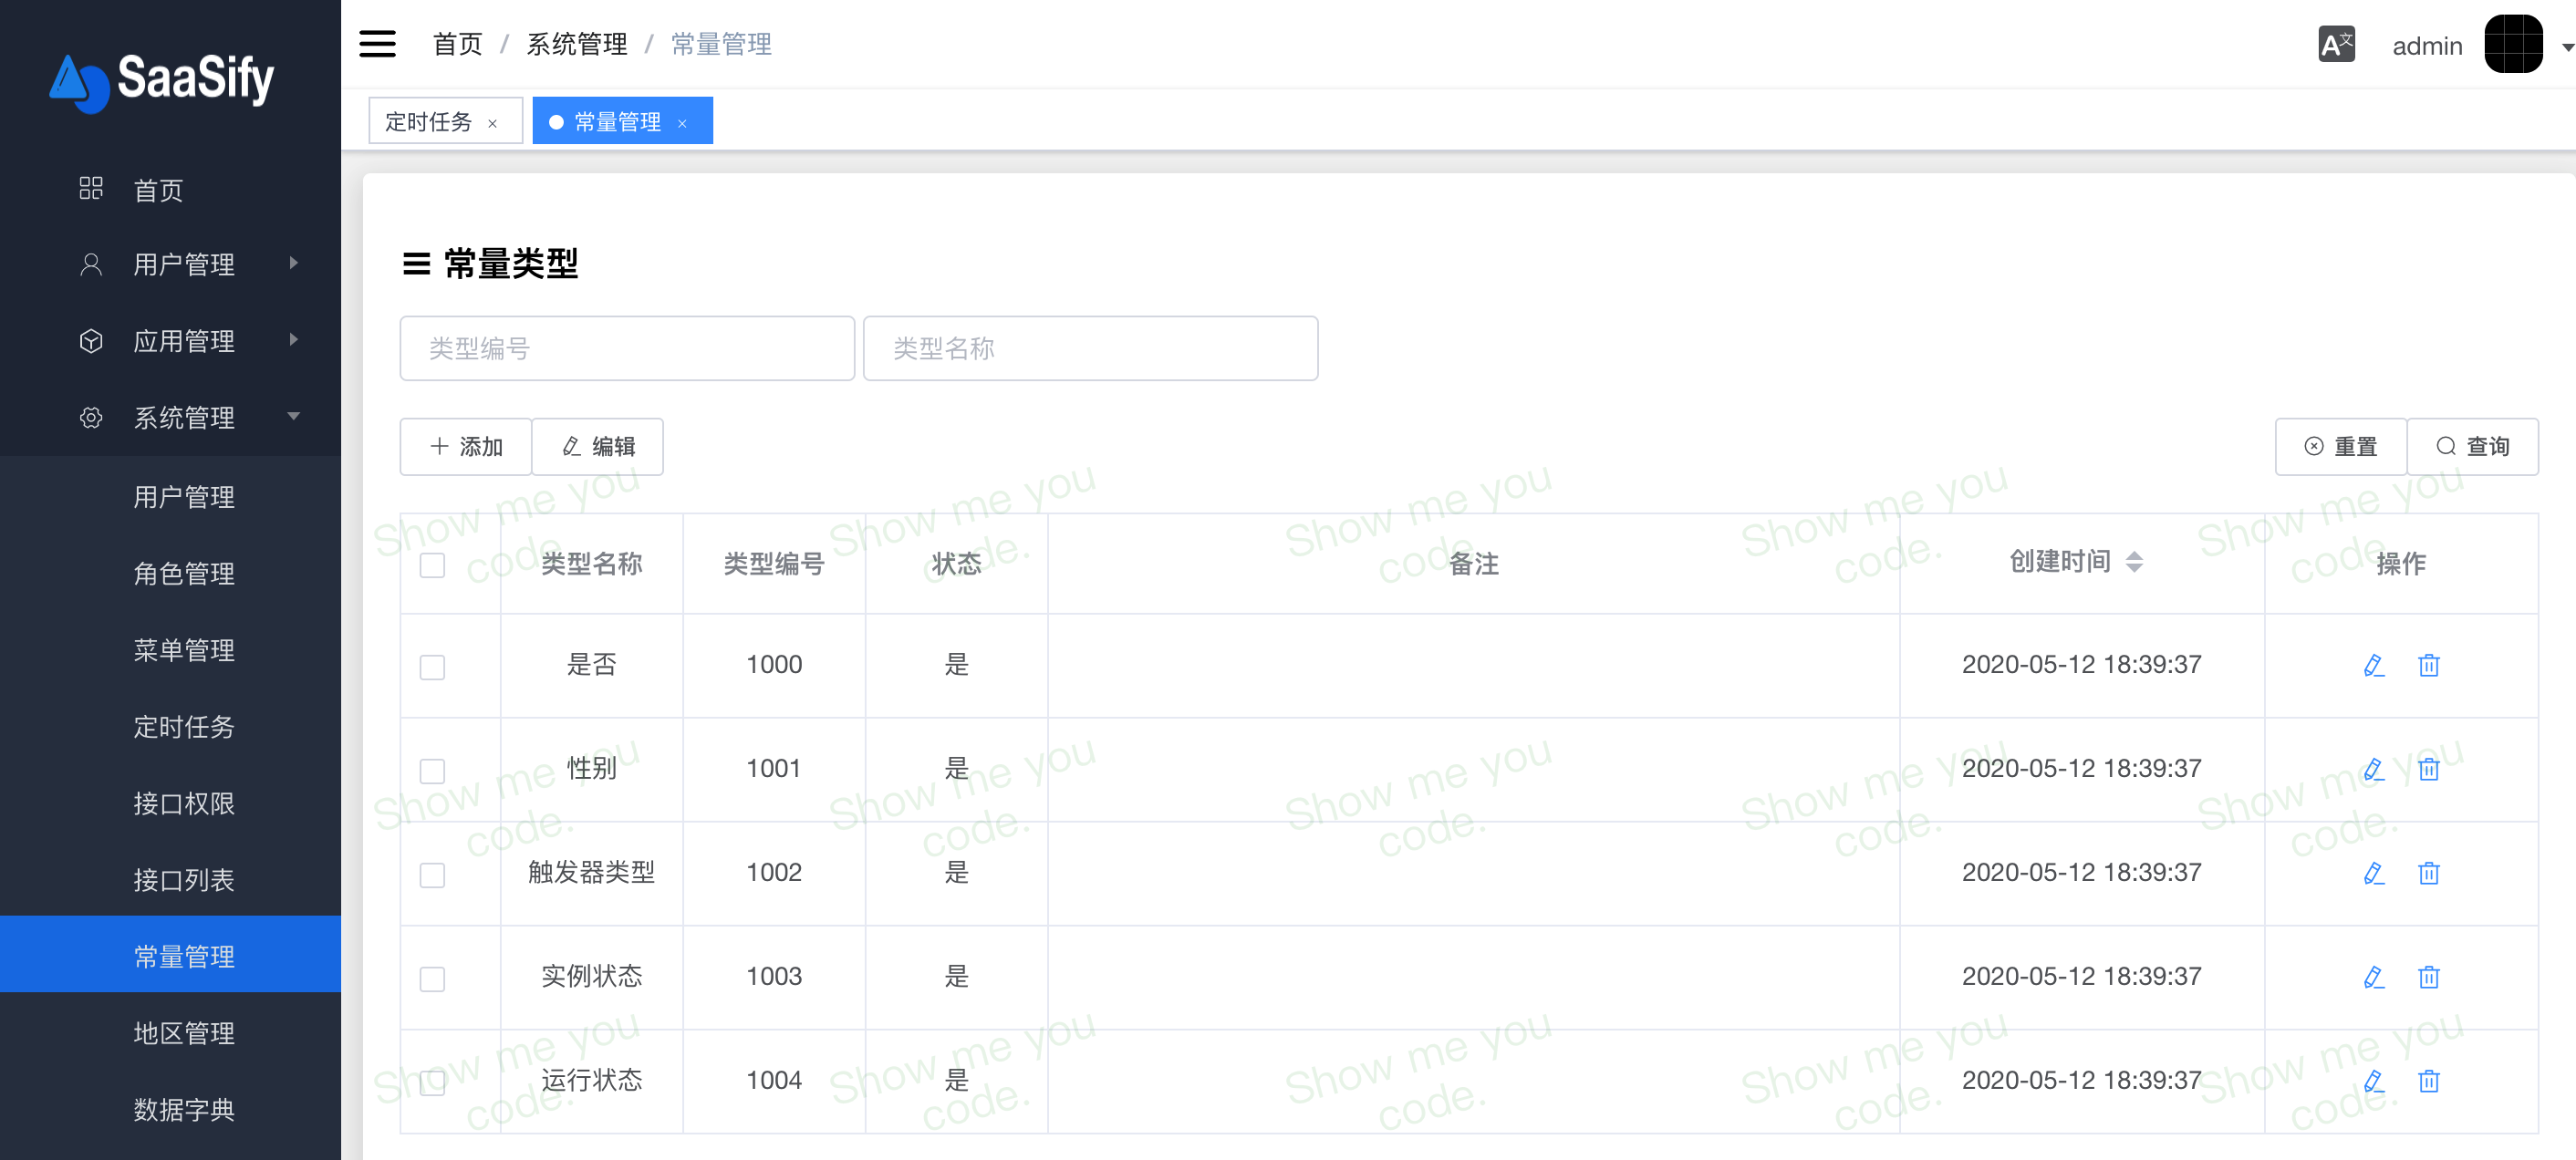
前端使用:
123456789101112131415161718192021222324252627282930<template><!--组件使用--><sys-codev-if="cacheData.codes":cache-options="cacheData['codes']":type-code="'1000'":selected.sync="ok"/><!--过滤器使用--><span v-if="cacheData.statusMap">{{ scope.row.status | statusFilter(cacheData.statusMap['1000'])}}</span></template>import SysCode from '@/components/SysCode'import {cacheData} from '@/utils/cache'export default {name: 'demo',components: {SysCode},data() {return {cacheData: {},}},mounted() {cacheData(this.cacheData, '1000').then(() => {})}}
-
项目地址
如有需要使用其它语言实现后端,可以参考下面API文档实现对应接口即可。
项目地址
演示地址:
因为项目托管在github上面且第一次加载文件较多,所有打开会比较慢
小结
项目刚起步,由于个人能力精力有限,项目里的纰漏和不足欢迎👏大家指出和交流。开源不易,有了大家的支持和鼓励才能更好的走下去。